BMP180 GY-68 sensore di pressione barometrica
 Il BMP180 è un sensore di pressione atmosferica della Bosch.
Può essere utilizzato come sensore barometrico, di temperatura o altimetro di precisione.
Le principali caratteristiche sono:
Alimentazione: 3.3V – 5V
Assorbimento: 0,5uA
Logica: 3.3V
Pressione rilevata: 300 ~ 1100 hPa (-500 ~ 9000mt rispetto al livello del mare)
Risoluzione: 0,02 hPa (17cm)
Interfaccia: I2C 7bit con indirizzo 0x77 (non modificabile)
Maggiori informazioni si possono trovare direttamente sul sito del costruttore qui.
Il dadascheet è scaricabile da qui.
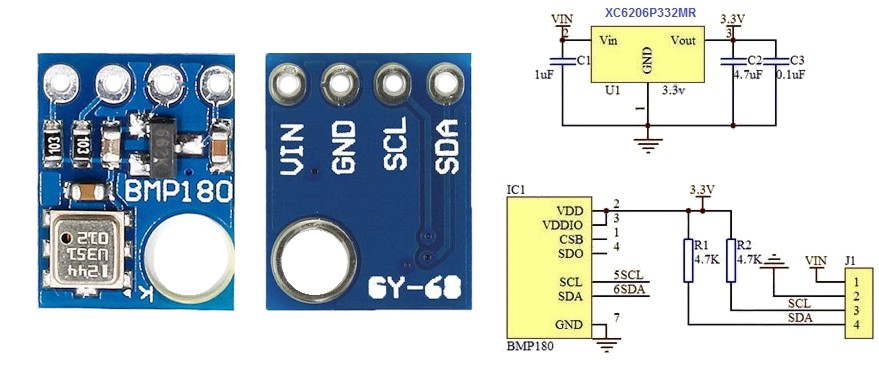
ll sensore BMP180 si può acquistare, già assemblato e dotato di tutti i componenti necessari all’utilizzo direttamente con Arduino, sui vari siti e e-commerce con la sigla GY-68 nella configurazione i2c come dal seguente schema:
UTILIZZO CON ARDUINO
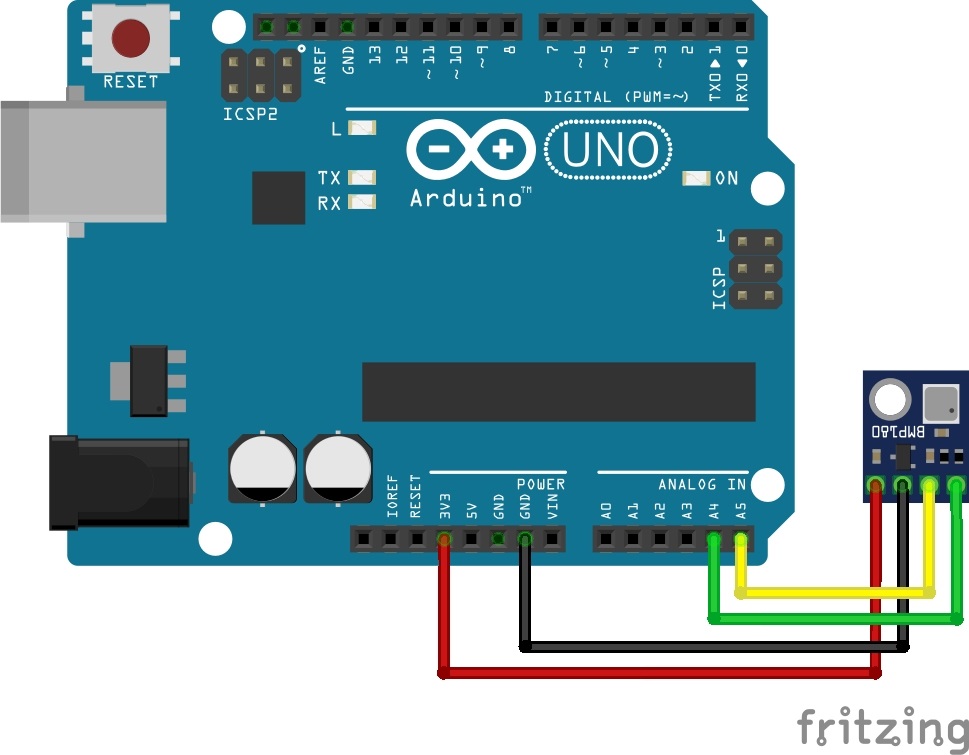
Per l’uso con un Arduino Uno si può utilizzare il seguente schema:
Per prima cosa andiamo a scoprire l’indirizzo i2c del sensore tramite lo Sketch i2c_scan che troveremo nella sezione “File” –> “Esempi” –> “Wire”–> “i2c_scaner” dell’IDE di Arduino.
Carichiamolo sulla nostra scheda ed apriamo il monitor seriale con il tasto ![]() Il risultato sarà simile al seguente:
Il risultato sarà simile al seguente:
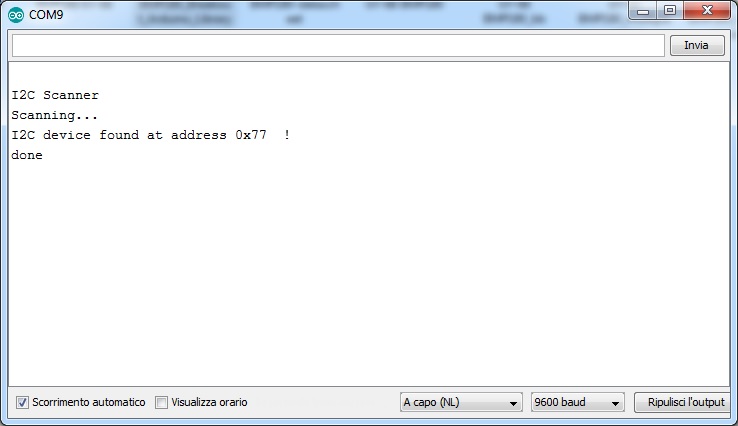
Quindi il suo indirizzo sarà 0x77 (purtroppo non è possibile cambiarlo, puù avanti vedremo come poter utilizzare piu sensori BMP180 contemporaneamente).
Per utilizzare con semplicità il sensore ci viene incontro la libreria creta da Sparkfun, la BMP180_Breakout_Arduino_Library, che può essere scaricata dal loro github da qui, oppure una copia dal nostro sito da qui.
Aggiungiamo la libreria appena scaricata all’IDE di Arduino andando su “Sketch” –> “#include libreria” –> “Aggiungi libreria da file .ZIP…” e selezionare la libreria scaricata.
NOTA: in alcune versioni dell’IDE di Arduino, per poter attivare la libreria appena installata, deve essere riavviato.
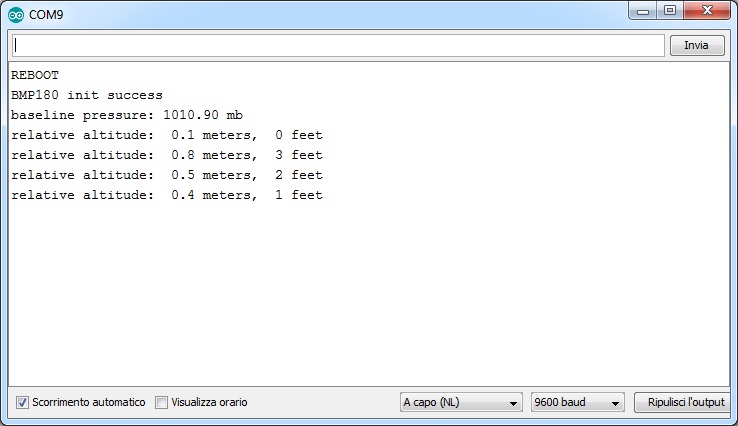
Ora andiamo su “File” –> “Esempi” –> “Sparkfun BMP180” –> “BMP180_altitude_example” e avremo il seguente codice:
#include <SFE_BMP180.h>
#include <Wire.h>

// You will need to create an SFE_BMP180 object, here called "pressure":

SFE_BMP180 pressure;

double baseline; // baseline pressure

void setup()
{
  Serial.begin(9600);
  Serial.println("REBOOT");

  // Initialize the sensor (it is important to get calibration values stored on the device).

  if (pressure.begin())
    Serial.println("BMP180 init success");
  else
  {
    // Oops, something went wrong, this is usually a connection problem,
    // see the comments at the top of this sketch for the proper connections.

    Serial.println("BMP180 init fail (disconnected?)\n\n");
    while(1); // Pause forever.
  }

  // Get the baseline pressure:

  baseline = getPressure();

  Serial.print("baseline pressure: ");
  Serial.print(baseline);
  Serial.println(" mb");
}

void loop()
{
  double a,P;

  // Get a new pressure reading:

  P = getPressure();

  // Show the relative altitude difference between
  // the new reading and the baseline reading:

  a = pressure.altitude(P,baseline);

  Serial.print("relative altitude: ");
  if (a >= 0.0) Serial.print(" "); // add a space for positive numbers
  Serial.print(a,1);
  Serial.print(" meters, ");
  if (a >= 0.0) Serial.print(" "); // add a space for positive numbers
  Serial.print(a*3.28084,0);
  Serial.println(" feet");

  delay(2000);
}


double getPressure()
{
  char status;
  double T,P,p0,a;

  // You must first get a temperature measurement to perform a pressure reading.

  // Start a temperature measurement:
  // If request is successful, the number of ms to wait is returned.
  // If request is unsuccessful, 0 is returned.

  status = pressure.startTemperature();
  if (status != 0)
  {
    // Wait for the measurement to complete:

    delay(status);

    // Retrieve the completed temperature measurement:
    // Note that the measurement is stored in the variable T.
    // Use '&T' to provide the address of T to the function.
    // Function returns 1 if successful, 0 if failure.

    status = pressure.getTemperature(T);
    if (status != 0)
    {
      // Start a pressure measurement:
      // The parameter is the oversampling setting, from 0 to 3 (highest res, longest wait).
      // If request is successful, the number of ms to wait is returned.
      // If request is unsuccessful, 0 is returned.

      status = pressure.startPressure(3);
      if (status != 0)
      {
        // Wait for the measurement to complete:
        delay(status);

        // Retrieve the completed pressure measurement:
        // Note that the measurement is stored in the variable P.
        // Use '&P' to provide the address of P.
        // Note also that the function requires the previous temperature measurement (T).
        // (If temperature is stable, you can do one temperature measurement for a number of pressure measurements.)
        // Function returns 1 if successful, 0 if failure.

        status = pressure.getPressure(P,T);
        if (status != 0)
        {
          return(P);
        }
        else Serial.println("error retrieving pressure measurement\n");
      }
      else Serial.println("error starting pressure measurement\n");
    }
    else Serial.println("error retrieving temperature measurement\n");
  }
  else Serial.println("error starting temperature measurement\n");
}
Carichiamolo sulla nostra scheda ed apriamo il monitor seriale con il tasto ![]() Il risultato sarà simile al seguente:
Il risultato sarà simile al seguente:
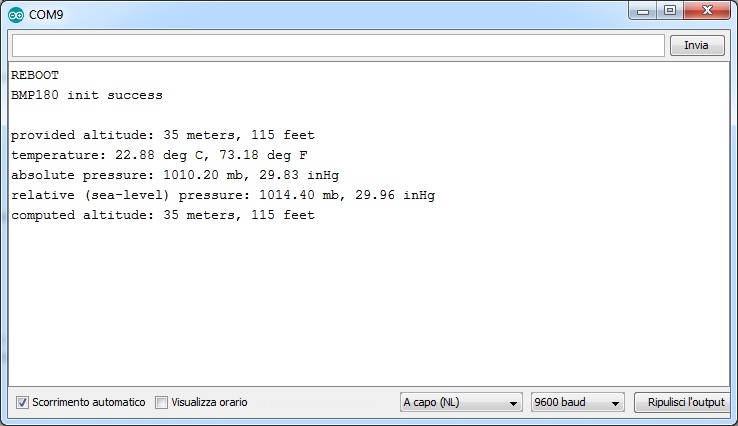
Ora andiamo su “File” –> “Esempi” –> “Sparkfun BMP180” –> “SFE_BMP180_example” e avremo il seguente codice:
#include <SFE_BMP180.h>
#include <Wire.h>

// You will need to create an SFE_BMP180 object, here called "pressure":

SFE_BMP180 pressure;

#define ALTITUDE 1655.0 // Altitude of SparkFun's HQ in Boulder, CO. in meters

void setup()
{
  Serial.begin(9600);
  Serial.println("REBOOT");

  // Initialize the sensor (it is important to get calibration values stored on the device).

  if (pressure.begin())
    Serial.println("BMP180 init success");
  else
  {
    // Oops, something went wrong, this is usually a connection problem,
    // see the comments at the top of this sketch for the proper connections.

    Serial.println("BMP180 init fail\n\n");
    while(1); // Pause forever.
  }
}

void loop()
{
  char status;
  double T,P,p0,a;

  // Loop here getting pressure readings every 10 seconds.

  // If you want sea-level-compensated pressure, as used in weather reports,
  // you will need to know the altitude at which your measurements are taken.
  // We're using a constant called ALTITUDE in this sketch:

  Serial.println();
  Serial.print("provided altitude: ");
  Serial.print(ALTITUDE,0);
  Serial.print(" meters, ");
  Serial.print(ALTITUDE*3.28084,0);
  Serial.println(" feet");

  // If you want to measure altitude, and not pressure, you will instead need
  // to provide a known baseline pressure. This is shown at the end of the sketch.

  // You must first get a temperature measurement to perform a pressure reading.

  // Start a temperature measurement:
  // If request is successful, the number of ms to wait is returned.
  // If request is unsuccessful, 0 is returned.

  status = pressure.startTemperature();
  if (status != 0)
  {
    // Wait for the measurement to complete:
    delay(status);

    // Retrieve the completed temperature measurement:
    // Note that the measurement is stored in the variable T.
    // Function returns 1 if successful, 0 if failure.

    status = pressure.getTemperature(T);
    if (status != 0)
    {
      // Print out the measurement:
      Serial.print("temperature: ");
      Serial.print(T,2);
      Serial.print(" deg C, ");
      Serial.print((9.0/5.0)*T+32.0,2);
      Serial.println(" deg F");

      // Start a pressure measurement:
      // The parameter is the oversampling setting, from 0 to 3 (highest res, longest wait).
      // If request is successful, the number of ms to wait is returned.
      // If request is unsuccessful, 0 is returned.

      status = pressure.startPressure(3);
      if (status != 0)
      {
        // Wait for the measurement to complete:
        delay(status);

        // Retrieve the completed pressure measurement:
        // Note that the measurement is stored in the variable P.
        // Note also that the function requires the previous temperature measurement (T).
        // (If temperature is stable, you can do one temperature measurement for a number of pressure measurements.)
        // Function returns 1 if successful, 0 if failure.

        status = pressure.getPressure(P,T);
        if (status != 0)
        {
          // Print out the measurement:
          Serial.print("absolute pressure: ");
          Serial.print(P,2);
          Serial.print(" mb, ");
          Serial.print(P*0.0295333727,2);
          Serial.println(" inHg");

          // The pressure sensor returns abolute pressure, which varies with altitude.
          // To remove the effects of altitude, use the sealevel function and your current altitude.
          // This number is commonly used in weather reports.
          // Parameters: P = absolute pressure in mb, ALTITUDE = current altitude in m.
          // Result: p0 = sea-level compensated pressure in mb

          p0 = pressure.sealevel(P,ALTITUDE); // we're at 1655 meters (Boulder, CO)
          Serial.print("relative (sea-level) pressure: ");
          Serial.print(p0,2);
          Serial.print(" mb, ");
          Serial.print(p0*0.0295333727,2);
          Serial.println(" inHg");

          // On the other hand, if you want to determine your altitude from the pressure reading,
          // use the altitude function along with a baseline pressure (sea-level or other).
          // Parameters: P = absolute pressure in mb, p0 = baseline pressure in mb.
          // Result: a = altitude in m.

          a = pressure.altitude(P,p0);
          Serial.print("computed altitude: ");
          Serial.print(a,0);
          Serial.print(" meters, ");
          Serial.print(a*3.28084,0);
          Serial.println(" feet");
        }
        else Serial.println("error retrieving pressure measurement\n");
      }
      else Serial.println("error starting pressure measurement\n");
    }
    else Serial.println("error retrieving temperature measurement\n");
  }
  else Serial.println("error starting temperature measurement\n");

  delay(5000);  // Pause for 5 seconds.
}
Prima di utilizzarlo modificare la righa:
#define ALTITUDE 1655.0 // Altitude of SparkFun’s HQ in Boulder, CO. in meters
inserendo l’altitudine di dove stiamo effettuando le rilevazioni in metri con .0 alla fine (nel nostro caso abbiamo utilizzato 35.0).
Carichiamolo sulla nostra scheda ed apriamo il monitor seriale con il tasto ![]() Il risultato sarà simile al seguente:
Il risultato sarà simile al seguente:
USO DI PIU’ SENSORI BMP180
Per utilizzare 2 o più sensori BMP180 si utilizza il seguente schema:
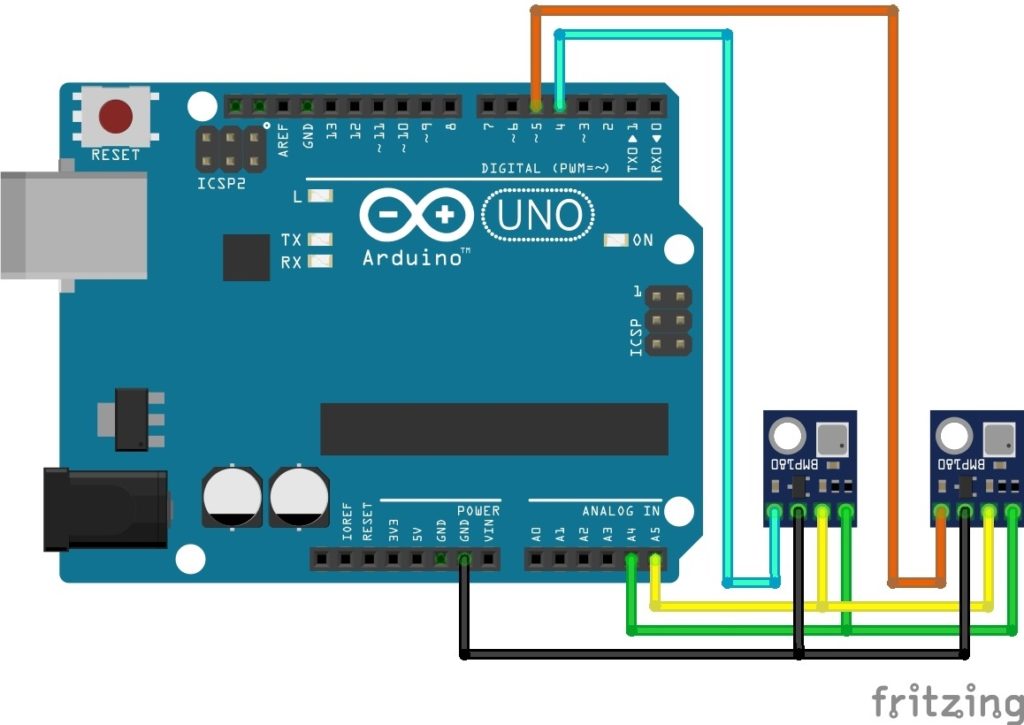
L’indirizzo i2c del sensore BMP180 non può essere modificato e, dato che non ci possono essere sulla stessa linea i2c più apparati con lo stesso indirizzo, non poremo utilizzare più di un BMC180 contemporaneamente.
Dato il basso assorbimento del sensore possiamo adottare uno stratagemma, alimentare un sensore alla volta tramite un pin di Arduino, (come se fosse un LED).
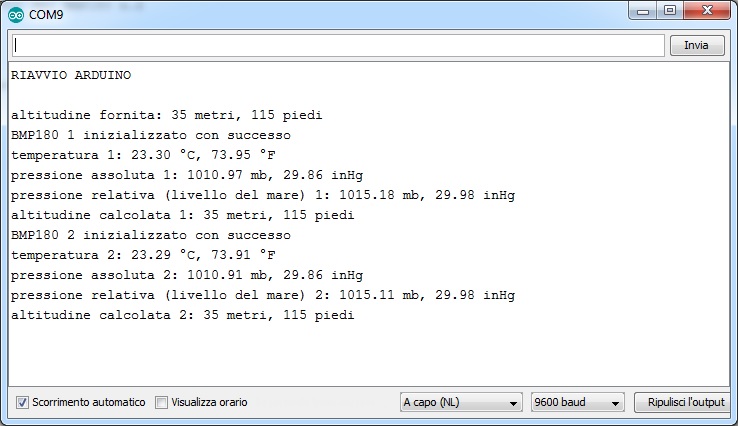
Lo sketch da adottare sarà come il seguente:
#include <SFE_BMP180.h>
#include <Wire.h>

#define BMP180_1 4 // definisce su quale pin di arduino è collegato il VCC del BMP180 n.1
#define BMP180_2 5 // definisce su quale pin di arduino è collegato il VCC del BMP180 n.2

SFE_BMP180 pressure;

#define ALTITUDE 35.0 // Altitude of SparkFun's HQ in Boulder, CO. in meters

char status1;
double T1, P1, p01, a1;
char status2;
double T2, P2, p02, a2;

void setup() {
  Serial.begin(9600);
  Serial.println("RIAVVIO ARDUINO");

  pinMode(BMP180_1, OUTPUT);
  pinMode(BMP180_2, OUTPUT);
  digitalWrite(BMP180_1, LOW);
  digitalWrite(BMP180_2, LOW);
  Serial.println();
  Serial.print("altitudine fornita: ");
  Serial.print(ALTITUDE, 0);
  Serial.print(" metri, ");
  Serial.print(ALTITUDE * 3.28084, 0);
  Serial.println(" piedi");
}

void lettura_1() {
  digitalWrite(BMP180_1, HIGH);
  delay(100);
  if (pressure.begin())
    Serial.println("BMP180 1 inizializzato con successo");
  else {
    Serial.println("BMP180 1 inizializzazione fallita\n\n");
    while (1); // Pause forever.
  }
  status1 = pressure.startTemperature();
  if (status1 != 0)
  {
    delay(status1);
    status1 = pressure.getTemperature(T1);
    if (status1 != 0) {
      Serial.print("temperatura 1: ");
      Serial.print(T1, 2);
      Serial.print(" °C, ");
      Serial.print((9.0 / 5.0)*T1 + 32.0, 2);
      Serial.println(" °F");
      status1 = pressure.startPressure(3);
      if (status1 != 0) {
        delay(status1);
        status1 = pressure.getPressure(P1, T1);
        if (status1 != 0) {
          Serial.print("pressione assoluta 1: ");
          Serial.print(P1, 2);
          Serial.print(" mb, ");
          Serial.print(P1 * 0.0295333727, 2);
          Serial.println(" inHg");
          p01 = pressure.sealevel(P1, ALTITUDE); // we're at 1655 meters (Boulder, CO)
          Serial.print("pressione relativa (livello del mare) 1: ");
          Serial.print(p01, 2);
          Serial.print(" mb, ");
          Serial.print(p01 * 0.0295333727, 2);
          Serial.println(" inHg");
          a1 = pressure.altitude(P1, p01);
          Serial.print("altitudine calcolata 1: ");
          Serial.print(a1, 0);
          Serial.print(" metri, ");
          Serial.print(a1 * 3.28084, 0);
          Serial.println(" piedi");
        }
        else Serial.println("error retrieving pressure measurement\n");
      }
      else Serial.println("error starting pressure measurement\n");
    }
    else Serial.println("error retrieving temperature measurement\n");
  }
  else Serial.println("error starting temperature measurement\n");

  digitalWrite(BMP180_1, LOW);
}

void lettura_2() {
  digitalWrite(BMP180_2, HIGH);
  delay(100);
  if (pressure.begin())
    Serial.println("BMP180 2 inizializzato con successo");
  else {
    Serial.println("BMP180 2 inizializzazione fallita\n\n");
    while (1); // Pause forever.
  }
  status2 = pressure.startTemperature();
  if (status2 != 0)
  {
    delay(status2);
    status2 = pressure.getTemperature(T2);
    if (status2 != 0) {
      Serial.print("temperatura 2: ");
      Serial.print(T2, 2);
      Serial.print(" °C, ");
      Serial.print((9.0 / 5.0)*T2 + 32.0, 2);
      Serial.println(" °F");
      status2 = pressure.startPressure(3);
      if (status2 != 0) {
        delay(status2);
        status2 = pressure.getPressure(P2, T2);
        if (status2 != 0) {
          Serial.print("pressione assoluta 2: ");
          Serial.print(P2, 2);
          Serial.print(" mb, ");
          Serial.print(P2 * 0.0295333727, 2);
          Serial.println(" inHg");
          p02 = pressure.sealevel(P2, ALTITUDE); // we're at 1655 meters (Boulder, CO)
          Serial.print("pressione relativa (livello del mare) 2: ");
          Serial.print(p02, 2);
          Serial.print(" mb, ");
          Serial.print(p02 * 0.0295333727, 2);
          Serial.println(" inHg");
          a2 = pressure.altitude(P2, p02);
          Serial.print("altitudine calcolata 2: ");
          Serial.print(a2, 0);
          Serial.print(" metri, ");
          Serial.print(a2 * 3.28084, 0);
          Serial.println(" piedi");
        }
        else Serial.println("error retrieving pressure measurement\n");
      }
      else Serial.println("error starting pressure measurement\n");
    }
    else Serial.println("error retrieving temperature measurement\n");
  }
  else Serial.println("error starting temperature measurement\n");

  digitalWrite(BMP180_2, LOW);
}

void loop() {
  lettura_1();
  delay(5000);  // Pause for 5 seconds.
  lettura_2();
  delay(5000);  // Pause for 5 seconds.
}
Carichiamolo sulla nostra scheda ed apriamo il monitor seriale con il tasto ![]() Il risultato sarà simile al seguente:
Il risultato sarà simile al seguente: